Baseball Facility Netting 101, 202 & 303
Published February 15, 2023
This post is 0% AI Generated.
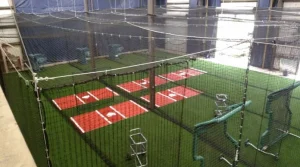
Let’s first consider the materials needed for Batting Cage Installation and then we’ll discuss facility layout and some nuances of facility netting.
What’s the difference between HDPE and Nylon Netting?
The most obvious question is what type of netting to buy. We largely cover this in the ATXTurf Comprehensive Guide to DIY Backyard Batting Cages available here. But the high level summary is that HDPE (High-Density Polyethylene), commonly known as Poly Netting, is less expensive and less durable than Nylon Netting. Poly, short for polyethylene, is a type of plastic that is lightweight, durable and resistant to moisture, UV Rays and chemicals and is often used in packaging, agriculture and horticulture. Nylon Netting, on the other hand, is made of nylon fibers known for their tensile strength and abrasion resistance which is more ideal for sports netting, fishing nets and cargo netting.
If you are on a budget and are designing a batting cage with less frequent use, or very young athletes who are not hitting or throwing balls as hard, Poly Nets may serve you well for the duration of your kid’s interest in baseball or softball. If you are designing a High School or Collegiate level facility with teams constantly coming through, Nylon is most likely your way to go. There are varying thicknesses and gauges within this materials which are covered in our guide, but #36 Gauge Nylon is by far the most commonly used in cages across the US.
How should I layout my cage facility?
The ATXTurf team is fortunate to have members with previous backgrounds in business consulting for Fortune 500 companies. So let’s apply some business logic to your batting cage facility and ask “What are your goals with the facility?” Is this a for-profit business venture? Is this a non-profit 501C organization and the primary goal is to serve as many kids in the community as possible? Maybe you are a retired baseball player and this is simply a hobby? Let your primary goal dictate the layout of your cages and facility.
In a for-profit business, your financial obligation is to bring in more money than your costs, pay back your investors or loan, cover the bills and pay yourself enough to live, and maybe more. Whether you are charging team memberships, individual lessons, or by the hour, the space needs to accommodate enough cages to accommodate enough players simultaneously that your hourly income covers your rent, facility insurance, utilities, payroll, maintenance, concessions and so forth.
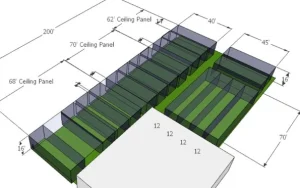
If you already have a warehouse or space procured, the task at hand becomes fitting as many working areas in the space as reasonably possible. As a simple example, let’s say you have a space that is a rectangle of 50’ by 80’. Reasonably, you can fit 3, 15 x 70 cages leaving enough room around the edges, about 2.5 ft between the net and walls on the sides and 5’ ft between the nets and walls on the ends for viewing. This gives you 3 full size cages for regulation baseball pitching and hitting. Or you can divide these three cages in two, and have 6 simultaneous short toss or T stations. (Some facilities install a divider net half way in the cage at 35’, however, we have found that simply having a 10’ x 10’ portable safety screen in there provides more flexibility, as you can move it to wherever you need it)
Divider Nets for Batting Cages
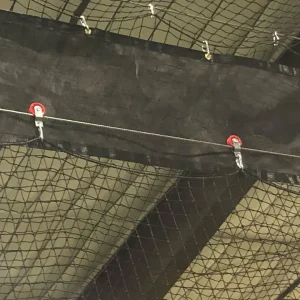
Batting Cage Divider Nylon Panels
While individual cages, in common dimensions, are readily for sale, facilities are often better off ordering a shell net, with sliding dividers separating the different areas. If the space is 100’L x 100’w x 20’ H, for example, you may want to simulate an indoor field which is completely wide open. Then transform the space into individual cages by pulling 5 sliding nets across the area to create 6, 94’ long’ cage areas, each 15’.(15’ x 6= 90’W’)
In this case, you would order a “shell” net, which comes in 1 very large, 5 sided net, pre-sewn together.(It ships in a very large cardboard box on a pallet) The shell dimensions would be 94’ x 94’ x 18’. This leaves 3 feet around every edge and 2 feet below the ceiling height. Then, you would order 5 divider net panels of 18’H x 94L which will slide back and forth on the galvanized cable using either carabiner clips or split bracket pulleys. (see closeup image) Typically, 1.5 feet of nylon hangs from the ceiling on either side of the top of the divider net. The galvanized cable from which the dividers hang, are actually roughly 6 inches below the ceiling net cables, so the nylon panels prevent the balls from going up and over the divider net cables.
Note: When sliding the divider panels to open up the space,, the initial impulse is to grab the end of the divider net and walk it down to the other end. If you can resist the tendency to do this, but rather stand on one end and PULL the nets back in a swimming motion, this will help prevent your nets from sagging over time. When you walk the net down, it constantly pulls down on the galvanized cable and makes the cable, and subsequently the net, sag over time.
Carabiners vs Split Bracket Pulleys
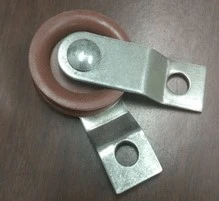
Split Bracket Pulley
Another common headache for facilities owners, is that divider nets get harder to slide over time because the carabiner slips are often too close together, the cables rubs the inside of the clip, or the clips get crossed over each other and tangled. Someone has to get a ladder out and get up there and untangle it. Split Bracket pulleys help solve this problem and make it much easier to slide the sliders back and forth. Split Bracket pulleys are not typically available at local stores and need to be special ordered. Do not confuse Split Bracket with the “Closed” bracket pulleys which ARE available at Home Depot and Lowes. They need to be a SPLIT bracket, where both sides hang freely, in order to run the cable under the wheel, clip the carabiner through the 2 holes and then to the roped edge of the net. The nylon wheels are usually in white or maroon and are not that expensive. They can be used every 18 inches or so. In our 94’ example, you would need about 63 per slide or, 313 for all 5 sliders. You should order about 330 for good measure.
White Ceiling Nets for Batting Cage Facilities

White Ceiling Netting
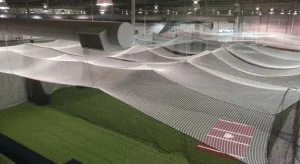
White Batting Cage Ceiling Netting
If available, white ceiling nets allow for a much lighter and brighter facility. The white net can be sewn together with the black sides just like the black ceiling net. White netting is, however, a lot less common and may not be available in every gauge. Ask your ATXTurf rep about the availability of a white ceiling net at the time of purchase.
Should I secure the net to the floor or leave it loose laid?
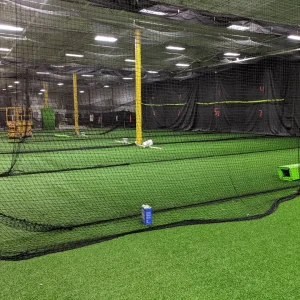
Loose Laid Netting
While the ATXTurf team has our own netting installers, we have worked with many netting installers across the country over the years and everyone has their own opinion. Some installers like to see a nice, tight, boxy feel to the cages where the nets are secured to the ground, corners and pulled tightly. While aesthetically, it appears very clean and orderly, we have experienced a number of problems down the road in facilities.
When the net is secured to the floor, the net is typically anchored to a cable that runs along the floor, which is held in place by drilling holes in the floor
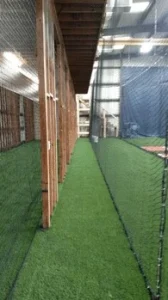
Tight Netting Installation
with metal hooks cemented into the holes to the hold the cable, then the rope of the net is clamped to the cable with O-rings every few inches. The problem is that from wear and kids hanging on the nets, it puts too much pressure on the net and these hooks break loose, leaving a net that hangs a foot off the ground with no easy way to reconnect it. Zip ties can work in a pinch, but are not ideal.
Most facilities you’ll see have the nets simply loose laid, where there is excess net at the bottom of the cage, and is oftentimes rolled up, then zip tied. This is the most common, as it’s the cheapest, but also does a perfectly fine job of containing the balls. It’s not that the ball comes off the bat and shoots under the net, its that the balls collect at the bottom of the net, then a ball gets it hard into the net, the net bounces up, and all the balls that were sitting at the bottom of the net and roll over into the next cage. This is the more common problem, but is easily solved with sand bags or a chain, or weighted cable lining the bottom of the net.
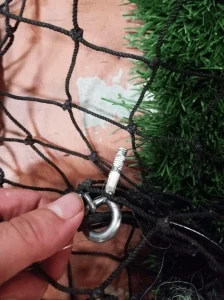
Anchor Pops Out
The other downside to securing the net to the floor is that it’s often done so, THROUGH the artificial turf. If the turf overlaps outside of the cage area, a hole is cut into the turf, in order to drill the hole in the floor, in order to cement the hook. The difficulty here is that the turf, especially new turf, needs room to expand over time. Especially in warmer temperatures. If the turf is secured by the netting, it won’t have room to move and will cause wrinkling in the turf over time. To fix it, the turf team has to come back, cut 6 inch slits around each netting anchor in order to then kick the wrinkles out of the turf. No Bueno. This is a situation you want to avoid.
Try Our Net Calculator Here!
Conclusion
Indoor Batting Facilities come in all shapes, sizes and conditions. Many times, we are stuck with the space we have, not the space we wish we had. But with some creativity and smart fore-planning, you can make the most of what you have into a world class facility that serves your business goals and most importantly your customers and athletes. The ATXTurf team brings decades of netting installation experience and we’ve run into almost every obstacle imaginable, when installing nets. Feel free to call ATXTurf today, if you need assistance planning and installing your netting system. 866-428-2809

Hi I’m looking for baseball exterior slide net 15” high 112’long can you please help me with that inf
Yes Sir, we can. I will have someone reach out to you.
Thank You,
ATXTurf Team