How to Install DIY Backyard Batting Cages – The ATXTurf Comprehensive Guide
Published January 6, 2023
Updated September 19, 2024
Added June 20, 2025. ATXTurf & Netting Installation Instruction Videos
This post is 0% AI Generated.
The ATXTurf team of baseball/softball coaches and parents finally put our collective experiences together as turf & netting professionals and compiled a comprehensive guide to assist our customers in making the most out of their investment in their DIY Backyard Batting Cages.
The Guide Below addresses 6 phases of building your own Backyard Batting Cage:
- Calculating Size & Dimensions of your Batting Cage Turf & Netting
- The Floor of the Cage – Subbase for the Turf
- Options for Securing the Turf to the Floor of Batting Cage
- Which Kind of Turf to Buy
- Which Kind of Netting to Buy
- How to hang Batting Cage Nets
Like many household projects, constructing a Backyard Batting Cage can quickly frankenstein into a money pit after the 4th trip to Home Depot. With a bit of foreplanning and research, you can make this DIY project less painful and most importantly, more economical.
This guide will help you understand all the considerations in DIY Batting Cage projects and the variables to each so you can make the decisions right for your space and budget. The ATXTurf Batting Cage Kits are an ideal solution for a variety of sizes.
Before we jump into the nuts and bolts, let’s cut straight to the chase and start with the elephant in the room, Money. Most families with kids are working within tight budgets. Budgets which are often already exhausted with travel baseball & tournament fees, hitting lessons, equipment, school fundraisers and the list goes on. So when it comes to investing in a home batting cage in your backyard, the first goal should be to only invest in what is really necessary for your particular situation.
You will often read about the “recommended” materials for a home batting cage. The higher end turf, a permanent subbase, the higher gauge net, the $1500 mound or $2,000 pitching machine. But before spending thousands of dollars, consider your situation what you REALLY need for now.
If you have 3 kids ranging from ages 4 to 10 for example, and don’t plan on moving anytime soon, there is a good chance you will be using the cage for another 12 years. In this case, it makes sense to invest in a thicker turf or higher gauge netting. If your kid is a sophomore in high school, and will only be using this cage for 2 more years, you can probably get away with the cheaper turf with existing lines in it leftover from another job or lower net gauge. You don’t need to pay for materials with 8 year warranties.
1. Calculating Batting Cage Dimensions
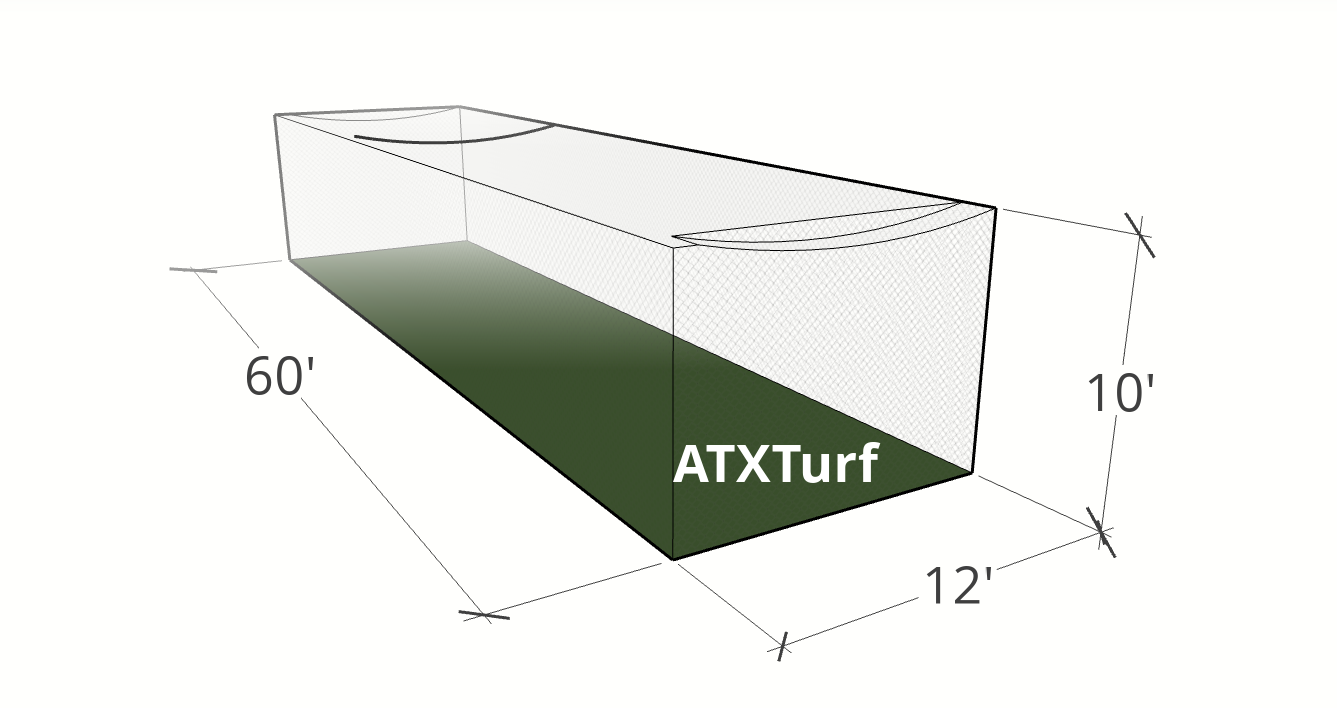 How do you decide what size cage you need? Below is a list of things to consider when measuring the width, height and length of your cage. Once you figure out the size of the cage you need, you can then figure the size of turf and nets needed.
Width
Typically a cage needs to be 14 ft wide. Batting Mats are 12ft x 6ft for a reason, as they match the dimensions of official batters boxes. As kids grow, they need the additional foot on either side, so the net doesn’t interfere with their swing. Is your kid only a righthander? Maybe. You could get away with a narrower cage if your garage or basement space limits you, but it’s ideal to emulate the full batters box with room on either side.
Height
Ideally, you want the cage, or “ceiling net” to be as tall as possible. Pre-fab cage nets are typically sold as 12’ high. The ATXTeam has installed netting in buildings with lower drop ceilings out of necessity, however, keep in mind that the ceiling net hangs down in the middle and even sags a foot or two over time. This becomes a problem, especially if the pitcher is on a mound, as the net can start to interfere with the pitching motion. The other downside to lower nets, is that the ball comes off the bat, hits the lower net and then rains down on the pitcher. If you have the budget, taller ceiling nets are ideal for the obvious reason, that you can see the trajectory of the hit at longer distances.
Length
Batting Cage length can be more variable than the width or height. The most common length is 70 feet, as this accounts for the regulation baseball distance between the pitching rubber and the rear homeplate point of 60 feet 6 inches with enough room behind each. The official High School and College Softball distance from plate to rubber is 43 ft. The standard little league baseball distance is 46 feet so batting cages for softball and little league are often sold as 50’ long if you need to recreate life-like pitching & hitting.
On the other hand, to simply create a tee station or soft toss area, a smaller cube of 12’w x 12’h x 12’h suffices. Often, a smaller mesh golf netting can be used and this area can double as a golf tee area.
Backyards, basements and garages come in many shapes and sizes and so the dimensions of your cage may be dictated by these space limitations. If your garage only allows for a 10’ high net, by 10’ wide by 10’ foot long, this is all doable with custom netting orders. Maybe your backyard has trees 20 ft apart and its easy enough to run galvanized cable from one to the other and hang your nets from there. You can run them 12’ft high and however wide you like for a 12’h x 15’w x 20’l cage. Understanding the advantages or limitations of the sizes can help you better understanding whether the investment is worth it.
2. The Floor of the Cage – Sub-bases for Home Batting Cage Turf
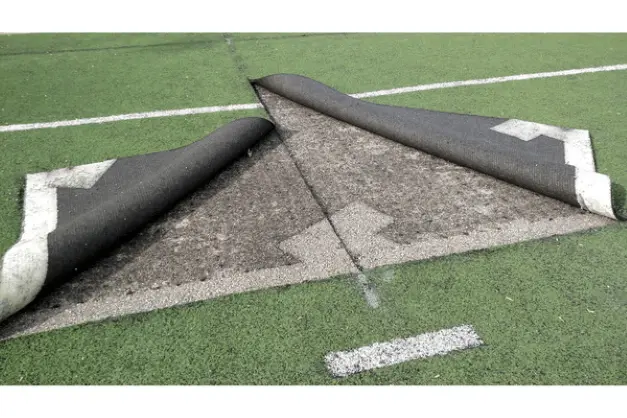
Turf Sub Base
Most garages and basements have a concrete slab as the floor and it is really straightforward how to roll a piece of turf over these areas where drainage is not a concern.
Outside batting cages, on the other hand, need to consider weather conditions and drainage when deciding on the ideal surface. We are often asked whether turf can be laid out over dirt or grass areas. Technically, Yes. And that’s the least expensive solution. However, you’ll have a number of problems down the road. If you lay a piece of turf over an existing grass area, there is no compaction to the sub-base and will feel as though you are walking in pillows and be a tripping hazard. If you lay a piece of turf directly over dirt, it will be muddy when it rains, and the mud will seep up through the drainage holes onto the top of the turf and create a mess. When it dries out, the turf will cake up in the turf fibers and defeat the purpose of having turf in the first place.
The ideal sub-base for an outdoor batting cage is several inches of smaller gravel. After the area has been leveled and cleared of grass, rocks, roots and debris, it’s time to bring in the gravel, compact it, roll the turf out, and secure it. By smaller gravel, we mean 3/16 inch gravel which will compact nicely, as opposed to larger gravel, or “57’s,” often known as driveway gravel. This is too large to compact into a flat surface and will be bumpy under the turf. It’s not expensive. Usually around $65 a ton(currently in Georgia) and can often be delivered to a house for a small fee. The depth needs to be at least about 4 inches to have the ability to compact into a flat surface. Anything less than 4 inches will not compact very well. This amount also creates enough separation between the dirt and turf for water to drain through the turf and away, preventing mud from caking up in the turf.
How do you calculate how much gravel you will need for your cage area?
There are a number of calculators online where you can enter the length, width and depth of an area, and it will tell you how many lbs of gravel you need. Here is one example: https://www.calculator.net/gravel-calculator.html
So, if the cage will be 15 ft w x 70 ft l x 4 inches deep, you will need about 18 tons, which multiplied by $65 per ton is $1,170 in this case. A cage 15 ft wide and 20 ft long, would need about 5 tons, or about $325 worth of gravel. Note: If the delivery truck can access the area, you can sometimes request they unload the gravel onto the area itself and even slowly drive while dumping the gravel, minimizing the amount of manual work of spreading the gravel.
Once the gravel is spread evenly, its ideal to use a roller to compact it. Home Depot or Lowe’s have these plastic barrels with handles that you fill with water, which can roll over it, or you can rent a small roller at a tool rental place for the day. These rollers about $100 to $200. Another option is to use a garden tamp ($43) and manually tamp the entire area, or rent a Vibratory Plate Compactor at Home Depot for about $63 for 4 hours.
When the gravel is laid and compacted, you can unroll your turf over the area. You may need to cut the edges off of the turf, or even fit the turf in or around trees, curbs or any other obstacles. You can refer to the ATXTurf article here, for further instructions on cutting turf and tools needed.
3. Options for Securing the Turf to the Ground
There are 3 main ways to secure turf. They range from most expensive to least expensive.
Nailer Boards
Most professional turf jobs you see on athletic fields are otherwise, use nailer boards around the edges of the turf area. This is simply a piece of treated wood, usually a 2 x 6, buried vertically along the edge of the area. These are typically available in 8 or 10 foot “sticks” at the lumberyard or Home Depot. Then the gravel is filled in to keep the boards in place. Once the turf is laid and cut in, the turf is stapled to the nailer board every few inches. On large turf jobs, we use a heavy duty air compressor powered staple gun to go all the way around a field, however, on smaller DIY projects, you can simply use a staple gun. We prefer to use staples that are an inch long to really secure it. The DeWalt brand, available at Home Depot, makes a nice line of staple guns and 1 inch staples that will do the job.
Stakes
The less expensive and easier option for most backyards is to simply stake the turf down every 18 inches or so using 12 inch metal stakes, also available at Home Depot or here, at Amazon. This 25 pack for $45 . You would need about 5 boxes of these to secure a 15 x 70 cage area. (70 + 70 + 30 + 30 = 200 linear feet / 1.5 ft = 133 stakes) Make sure to comb back the blades of grass before driving in the stakes, or it will appear that you have dimples in the turf around the edge of the areas.
Rope or Railroad Ties
The net itself will often help keep the turf down. When you order a batting cage net, it comes with rope around the edge and extra length on it where you can roll the netting up and tie it off with zip ties. You want excess netting on the ground. Having the net simply touch the ground doesn’t prevent the balls from coming out from under the cage, You can order a weighted cable that can be threaded into the bottom of the net to keep it in place, or you’ll often see homemade sand bags that have been placed in the corners or along the edge of cage to keep the net secured the ground. Sometimes, the weight of the net, few stakes, a batting mat, a bucket of balls, a pitching mound and pitching machine is enough to keep the turf down.
Simply lining the cage with railroad ties is also a less expensive solution that doesn’t look terrible.
4. Which Kind of Batting Cage Turf to Buy
Home Batting Cage Turf
There are many kinds of artificial turf that range from less than $1 per square foot, all the way up to $5 per square foot. Flat “carpet-style”, tall “grass-style” turf, padded turf, unpadded turf, thatched turf all have their advantages and disadvantages. Some are made to look more like real grass, some are made to have more “cushion” for impact attenuation.
When it comes specifically to outside batting Cages, any of these technically work. The main purpose of outside batting cage turf, is to cover up muddy areas, prevent the balls from scraping on the ground and providing a consistent, green surface. The reality is that batting cage turf generally has less wear than other sports turfs. Many turfs are made for indoor soccer where 10 guys are constantly running in a small area for an hour, or high school football and soccer fields have 100s of kids running on it throughout the day. In contrast, baseball and softball turf, because of the nature of the sport, gets significantly less footwear and subsequently tends to last longer.
All of these turfs can achieve the purpose of batting cages in one form or another, but some work better than others. Below is a list of Advantages & Disadvantages of each.
Turf Type |
Pros |
Cons |
| Padded Turf |
More Cushion Ideal for Indoors Heavy enough to lay down by itself @ ca. 1 lb per sq ft Higher Resale Value |
Does not drain as well Can absorb moisture and smell More Expensive Heavier to Unload off truck and move. |
| Unpadded Turf |
Less Expensive than Padded Turf Ligher to Move @ .5 lbs per sq ft Drains better with drainage holes |
Very little cushion Does not look like real grass Must be secured or wind will blow it away Thinner and will wear faster |
| Grass Style Turf |
Looks like real grass Light weight @ ca. .5 lbs per sq ft or less Option to fill with sand Very Affordable |
May need filler for blades to stand up straight. |
| Grass Style Turf with Lines |
Often the least expensive Light weight @ ca. .5 lbs per sq ft Option to Fill with Sand or Rubber Drains Well |
Has white or colored lines in it but can be painted green May need filler for blades to stand up straight. |
For most outdoor DIY Home Batting Cages, a grass-style turf with lines is often the most budget friendly option that will do the things you need it to do. The lines can be painted or even cut out on site. If you decide it needs more cushion or weight, you can fill it with sand at a later time. Check out the turf options in Batting Cage Turf area of our store.
5. Which Kind of Netting to Buy
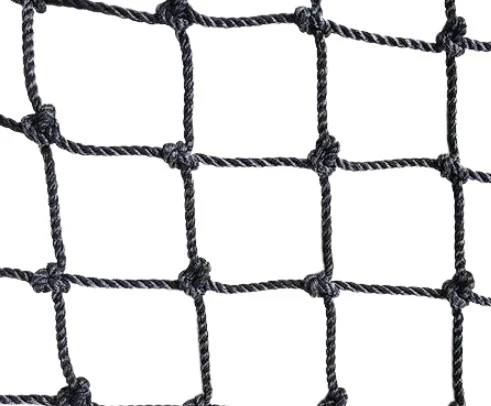 When buying sports netting there are 2 major aspects to consider. The material and the gauge.
Netting Materials
There are 2 options in Netting Material. Polyethylene(“Poly”) or Nylon. While the gauge is numerically measured by the diameter of the twine of the netting.
Poly nets are less expensive and have a lower impact absorption than nylon and are ok for less frequent or home uses.
Nylon nets are ideal for commercial batting cages, or heavy use, recreational, high school and collegiate levels. The most commonly sold for high school/collegiate level is nylon.
Netting Gauge
The Gauge of netting typically runs from #21 to #96 with #36 being the most commonly sold for high school and indoor batting facilities. Collegiate or pro facilities often opt for higher #42 or even #60 Gauge net. In order to save a few dollars, facilities have also been known to order lower gauges for lower use areas, while ordering a higher gauge for a net that they know will take a beating during hitting practice. Its not uncommon to see patched nets with higher gauges directly over the homeplate area in the ceiling panel or other high impact areas.
Custom Nets typically come with a rope border stitched around the edges which allow the net to be attached cables with carabiner clips. In addition, for outside use, nylon nets are often dipped in an oil that helps prevent against UV rays and weather elements.
Standard size nets like 12’ x 14’ x 70’ or 12’ x 14’ x 50’ are often available pre-made in stock where all 5 sides are already sewn together. For size that deviate from the norm, like 16’ x 20’ x 80’ for example, will have to be custom made and can take several weeks to manufacture and ship. They will typically have a single door cut in at one end of the net.
For at home outside, backyard batting cages, we recommend either #42 Gauge Poly, or #36 Gauge, nylon, oil dipped net.
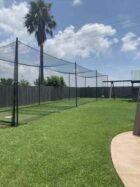
6. How to hang Batting Cage Nets
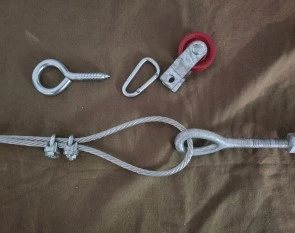 The most common method for hanging batting cage nets, is to use ¼ inch galvanized cable and carabiner clips, which can be ordered in bulk, are used to clip the cable to the rope border of the net. Note: never clip the carabiner straight to the netting twine, as its not made to withstand the tension. Always clip to the rope.
While galvanized cable is technically available in local stores, it doesn’t come in the lengths often needed for batting cages. Galvanized Cable can be ordered in spools from 250 to 1000’ in bulk from ATXTurf.
Indoors, the cable can be secured to walls in a number of ways, or tied around beams and secured with cable clamps. Outside, however, typically requires burying posts in the ground to create the frame from which you can run the cable through holes in the top. Batting Cage Kits are also available for varying sizes of cages, which contain the polls and attachments
If you have any further questions, do not hesitate to contact the ATXTurf during business hours at 866.428.2809 or send us an email through our contact form located here.
Need a catalog
Need instructions for SSBAC40 batting cage and a catalog
purchased a ATX batting cage kit, 12x12x60 with turf. Can you provide a layout for the poles, assume 8 poles and instructions on securing net to poles
Hi Jorge, Yes. We actually have a good blog article about the poles and frames. It’s located here… https://atxturf.com/batting-cage-frames-and-poles-all-you-need-to-know/
Thank You,
ATXTurf Team
I have a pole barn 1999 Sq ft I would love to turn into a training facility 4 lanes if possible but also rent it out to travel teams in the winter months plus still do private lessons it’s on my property in my back yard so can be used all year around just need advice on how to get started or where to start to get it started
Hi Milbourn, We will email you about the best way to get travel ball facility up and running.
Looking for the same email as John for a travel ball facility please and thank you.
I have metal 2×4 studs, for a 35′ cage what is the best way to brace the wall? 2×10 fastened to the outside of the wall or how could you do it
I love the DIY guide, thank you! Maybe I am missing something, but I don’t see any guidance on how to install poles into an outdoor base using 2×6 and gravel. Can you provide information on the best poles/frame to secure the net too?
Should they be cemented inside the 2×6’s?
Hi Garrett, Thanks for the feedback! You can read out blog post on batting cage frames and poles here: https://atxturf.com/batting-cage-frames-and-poles-all-you-need-to-know/
Thanks!
The ATXTurf Team